Milling your own lumber is a rewarding experience, whether you’re creating cut logs for furniture, beams for a cabin, or slabs for woodworking. However, achieving high-quality mill lumber begins long before the first cut—it starts with proper log preparation.
At Granberg International, we know that an efficient milling process depends on selecting the right log lengths, securing the best chainsaw mill setup, and preparing your materials properly. This guide will walk you through the best practices for cutting logs, stabilizing your workpiece, and maximizing efficiency when using an Alaskan chainsaw mill.
Why Log Preparation is Essential for Efficient Chainsaw Milling
The way you prepare your logs can significantly impact the quality of your lumber, the longevity of your equipment, and your overall milling 101 experience. Here’s why:
✔ Improved Milling Accuracy: Properly aligned logs ensure cleaner, more even cuts, reducing waste.
✔ Equipment Longevity: A well-prepared log reduces strain on your chainsaw, chainsaw bar, and ripping chain.
✔ Increased Safety: A stable and debarked log lowers the risk of kickback or blade pinching.
✔ Better Drying & Storage: A properly prepared log dries more evenly, preventing cracks and warping.
Step-by-Step Guide to Log Preparation for Chainsaw Milling
1. Choosing the Right Log for Milling
Selecting the right log is the foundation of your milling process. Consider these key factors:
- Species & Intended Use: Hardwoods like black walnut are perfect for furniture, while softwoods such as pine work well for structural lumber.
- Size & Straightness: Large, straight logs make cutting logs easier and result in higher-quality mill lumber. Keep in mind the conditions that the tree grew in. For example, trees that have grown on a hillside will tend to warp more than those grown on flat land because of the angle at which they are forced to grow.
- Condition: Dry logs are harder to cut but will experience less warping and checking, while green logs are easier to cut but will take longer to be usable. They will also be more prone to warping, checking and shrinkage
✔ Pro Tip: To minimize shrinkage and warping, consider the final drying process before milling. It is strongly recommended that you treat the ends of the logs with a sealant such as Anchor seal as soon as possible after the log is felled. This slows the drying process and reduces adverse effects of the wood drying too quickly. Lumber to dry properly should be stacked with spacers between slabs.
2. Measuring and Cutting Logs to the Optimal Length
- The best log lengths for milling depend on the project. Standard sawmill lengths range from 6 to 12 feet, but smaller projects may require small logs or shorter sections. If using a 10-foot EZ rail, the ideal length is 8 feet.
- Use a cant hook to maneuver the log into position before making your first cut.
- Mark your cutting line using chalk or a straightedge for accuracy.
✔ Pro Tip: When cutting logs, leave extra inches beyond your desired final lumber size to allow for shrinkage and end trimming.
3. Debarking and Cleaning Logs
Debark or clean logs before milling. This helps protect your saw chain and reduces debris buildup.
Methods for debarking:
✔ Drawknife – Ideal for debarking logs manually.
✔ Pressure washer – Efficient for removing loose bark and dirt.
✔ Debarking tool/bark spud – Attaches to a chainsaw bar for fast results.
✔ Pro Tip:Debark logs that will be stored for long periods before milling. Bark traps moisture, leading to rot and insect infestation.
4. Positioning the Log for Milling
Once your log is cleaned and measured, proper setup ensures smooth cutting:
- Use chocks or wedges to stabilize the log. This works to prevent rolling as you mill.
- Secure the guide rails on the log to create a flat, level reference for the first cut.
✔ Pro Tip: Never stand downhill of a log as you maneuver it.
5. Setting Up Your Chainsaw Mill
Your chainsaw mill setup is just as important as the log itself. Follow these steps:
✔ Choose the Right Chainsaw – make sure your saw has the power you need to do the job (LINK TO POWER CHART).
✔ Use a GRANBERG Ripping Chain – Standard chainsaw chains aren’t optimized for milling. A GRANBERG ripping chain provides a faster, cleaner cut.
✔ Check the Bar Length – Your chainsaw bar should be at least 6 inches longer than the log’s width if using a MKIV, or 2 inches with the Small Log mill.
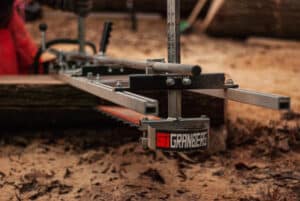
✔ Secure the Mill – Attach the Granberg MKIV Chainsaw Mill properly to ensure stable, even cuts.
✔ Pro Tip: Use an auxiliary oiler on longer bars to keep your bar and chain cool during extended milling sessions.
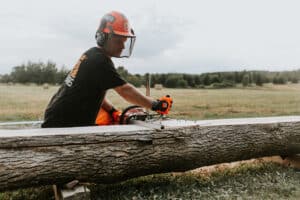
6. Making the First Cut
Your first cut establishes a level surface for milling lumber.
- Use guide rails (such as an extension ladder or the Granberg EZ-Rail System) for precision.
- Keep your saw bar perpendicular to the edge of the log as much as possible. If you start to slow down, DO NOT see-saw the bar through, as this will damage the cut surface. Be patient and let the saw do the work. An Alaskan winch is a great way to maintain the proper position of your mill.
- Insert wedges into the cant every 12-18″ as you progress to prevent the log from pinching the saw blade. A wedge should also go into the end of the log as soon as possible after the bar is clear of the initial cut. Wedges should only be inserted far enough to maintain the cant. Wedges inserted too far can disrupt your cut line.
✔ Pro Tip: If you’re milling 101 for the first time, watch a video on the world on YouTube for visual guidance.
Final Drying & Storing Your Milled Lumber
Once you’ve cut logs into lumber, proper final drying ensures they remain usable:
- Allow air circulation by stacking dry logs with spacers between slabs.
- Use Stickers – These small strips of wood create airflow between planks.
- Monitor Moisture Content – A moisture meter ensures that your timber dries properly.
✔ Pro Tip: Drying time follows the one year per inch rule—thicker lumber takes longer to dry.
Frequently Asked Questions (FAQ)
Q: What is the best log length for chainsaw milling?
A: It depends on the project, but 6 to 12 feet is the standard range.
Q: Can I use a standard chainsaw chain for milling?
A: You can, but the results will not be good. A ripping chain is specifically designed for cutting logs efficiently along the grain.
Q: How thick should I cut slabs for woodworking?
A: For furniture, slabs should be 1/4-1/2″ thicker than the desired final dimensions to allow for shrinkage during the drying process and to allow for material lost during planing/finishing.
Q: How do I prevent logs from splitting after milling?
A: Apply log sealer to the end of the log as soon as possible after felling trees. A second application can also be done after milling.
Q: What safety gear do I need for milling?
A: Wear chainsaw chaps, safety glasses, face shield, hearing protection, and gloves for safety. A dust mask is also highly recommended.
Start Milling Like a Pro with Granberg International
Preparing your logs properly is the first step to milling lumber efficiently. Whatever your project, proper log preparation ensures high-quality cut logs every time.
At Granberg International, we offer the best chainsaw mills, ripping chains, and first cut guides to help you mill logs with precision. If you’re looking to elevate your sawmill setup, explore our MKIV Chainsaw Mill and accessories today.
Turn your logs into beautiful, custom-milled lumber with Granberg International!